-
#24. Neural Machine Translation연구실 2019. 10. 28. 16:02
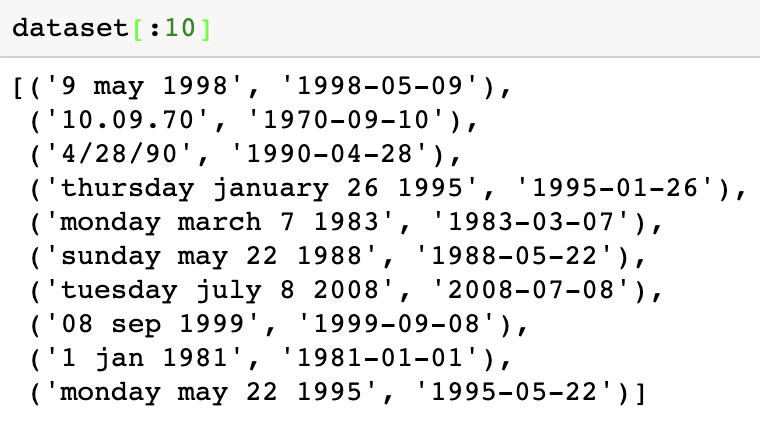
* Translating human-readable dates into machine-readable dates
- the 29th of August 1958, 03/30/1968, 24 JUNE 1987 등의 format으로 input으로 주어지면, 그것을 1958-08-29의 포맷으로 바꿔주는 모델을 만들어보자.
(1) Dataset
- 그런 다음 이런 데이터들을 index value로 매핑시켜 전처리를 하고, maximum length와 output의 길이도 정해준다.
* Neural machine translation with attention
(1) Attention mechanism
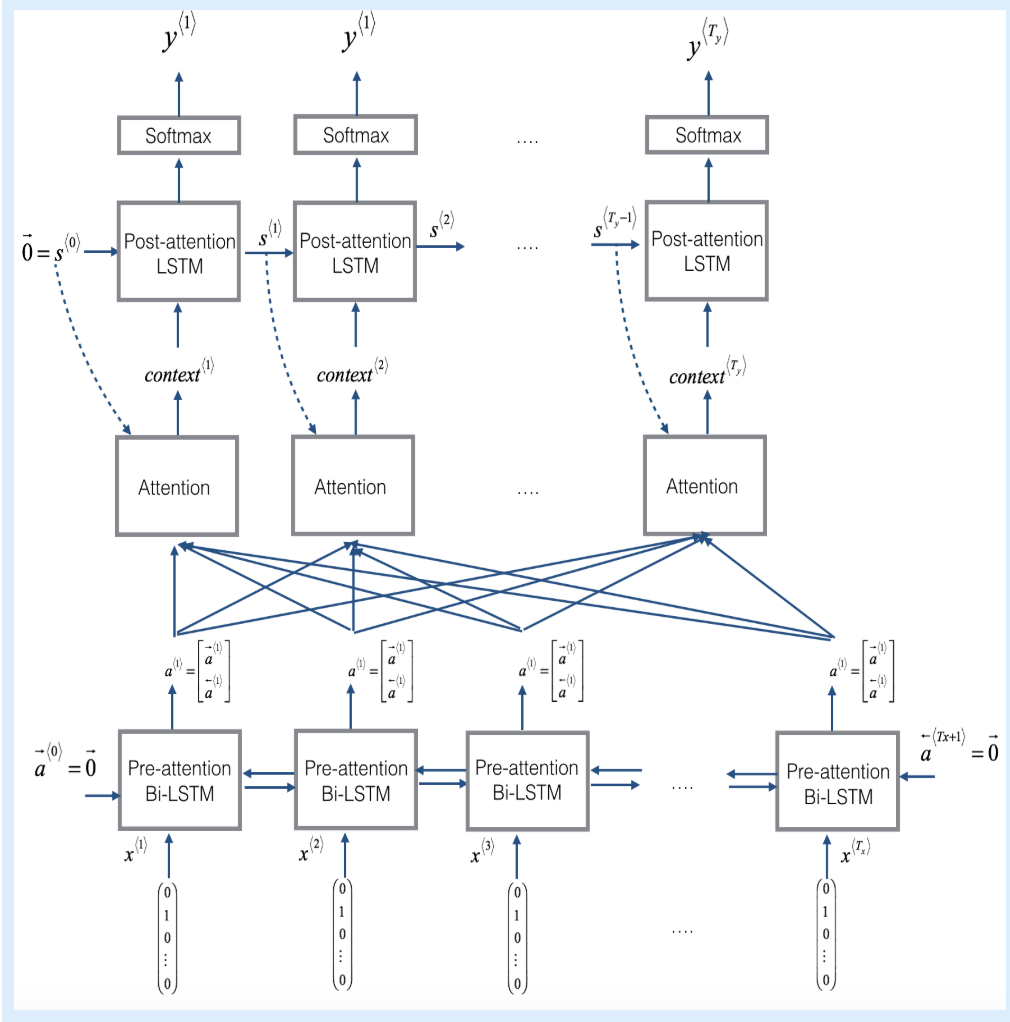
Attention model 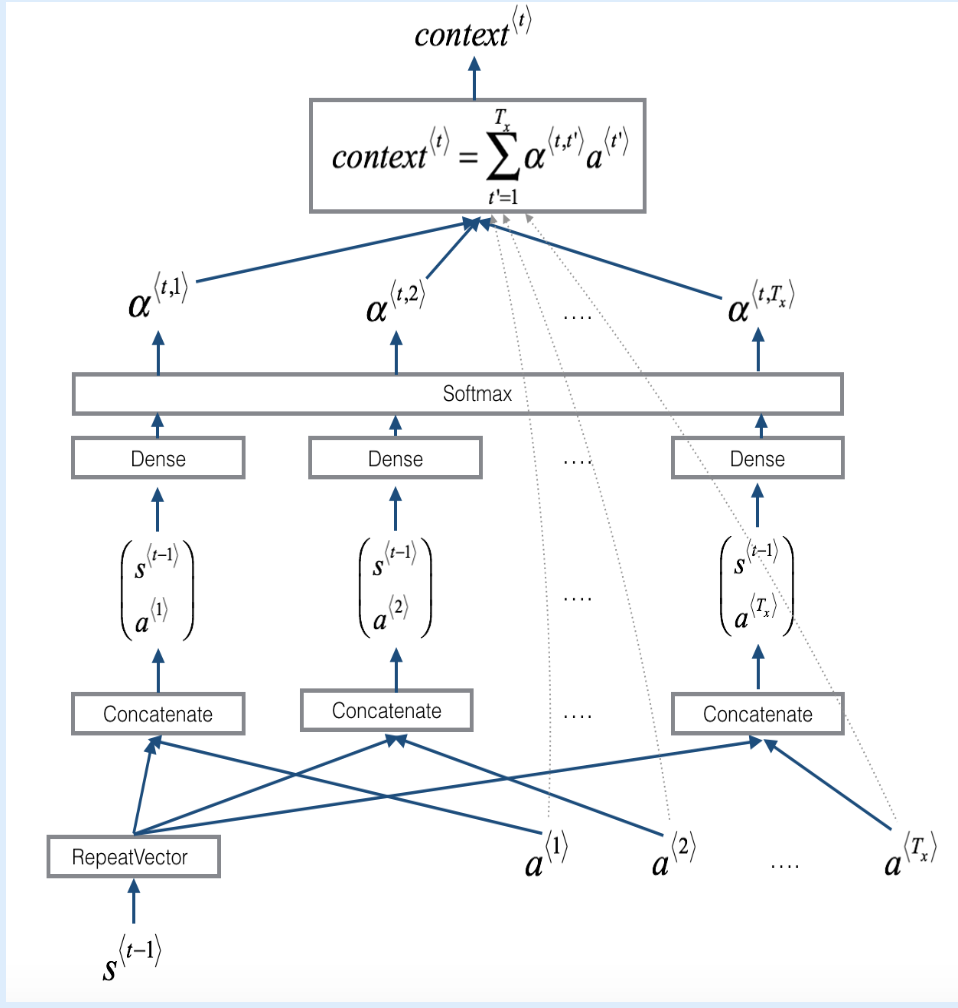
What one attention step does to calculate the attention variables a<t, t'> - 두 종류의 LSTM을 사용한다. 아래에 있는 것은 Bi-directional LSTM으로 attention mechanism 전에 위치한다. Tx time steps 동안 수행된다. 위에 있는 LSTM은 attention mechanism 다음에 위치하는 것이다. Ty time step 동안 수행된다.
- post-attention LSTM은 s<t>와 c<t>를 다음 step으로 전달한다. LSTM은 output activations s<t>와 hidden cell state c<t>를 input으로 가지지만 y<t-1>는 input으로 가지지 않는다. 이 모델에서는 이전의 결과(YYYY-MM-DD)가 다음 결과에 크게 영향을 미치지 않기 때문이다.
- a⟨t⟩=[a→⟨t⟩; a←⟨t⟩]: pre-attention Bi-LSTM의 forward와 backward activation을 합친 것을 나타내기 위해 사용!
- 차례대로 함수를 implement 해 보자.
1. one_step_attention
- context vector를 계산해준다.

# Defined shared layers as global variables
repeator = RepeatVector(Tx)
concatenator = Concatenate(axis=-1)
densor1 = Dense(10, activation = "tanh")
densor2 = Dense(1, activation = "relu")
activator = Activation(softmax, name='attention_weights') # We are using a custom softmax(axis = 1) loaded in this notebook
dotor = Dot(axes = 1)
# GRADED FUNCTION: one_step_attention def one_step_attention(a, s_prev): """ Performs one step of attention: Outputs a context vector computed as a dot product of the attention weights "alphas" and the hidden states "a" of the Bi-LSTM. Arguments: a -- hidden state output of the Bi-LSTM, numpy-array of shape (m, Tx, 2*n_a) s_prev -- previous hidden state of the (post-attention) LSTM, numpy-array of shape (m, n_s) Returns: context -- context vector, input of the next (post-attetion) LSTM cell """ ### START CODE HERE ### # Use repeator to repeat s_prev to be of shape (m, Tx, n_s) so that you can concatenate it with all hidden states "a" (≈ 1 line) s_prev = repeator(s_prev) # Use concatenator to concatenate a and s_prev on the last axis (≈ 1 line) concat = concatenator([a, s_prev]) # Use densor1 to propagate concat through a small fully-connected neural network to compute the "intermediate energies" variable e. (≈1 lines) e = densor1(concat) # Use densor2 to propagate e through a small fully-connected neural network to compute the "energies" variable energies. (≈1 lines) energies = densor2(e) # Use "activator" on "energies" to compute the attention weights "alphas" (≈ 1 line) alphas = activator(energies) # Use dotor together with "alphas" and "a" to compute the context vector to be given to the next (post-attention) LSTM-cell (≈ 1 line) context = dotor([alphas, a]) ### END CODE HERE ### return context2. model()
- 전체 모델을 implement한다. input을 Bi-LSTM에 넣어 [a<1>, a<2>, ..., a<Tx>]를 받아 one_step_atten()을 Ty번 호출해 해당 output을 LSTM에 softmax activation을 사용하는 dense 레이어에 통과시켜 prediction을 만들어낸다.
# GRADED FUNCTION: model

def model(Tx, Ty, n_a, n_s, human_vocab_size, machine_vocab_size):
    """
    Arguments:
    Tx -- length of the input sequence
    Ty -- length of the output sequence
    n_a -- hidden state size of the Bi-LSTM
    n_s -- hidden state size of the post-attention LSTM
    human_vocab_size -- size of the python dictionary "human_vocab"
    machine_vocab_size -- size of the python dictionary "machine_vocab"

    Returns:
    model -- Keras model instance
    """

    # Define the inputs of your model with a shape (Tx,)
    # Define s0 and c0, initial hidden state for the decoder LSTM of shape (n_s,)
    X = Input(shape=(Tx, human_vocab_size))
    s0 = Input(shape=(n_s,), name='s0')
    c0 = Input(shape=(n_s,), name='c0')
    s = s0
    c = c0

    # Initialize empty list of outputs
    outputs = []

    ### START CODE HERE ###

    # Step 1: Define your pre-attention Bi-LSTM. Remember to use return_sequences=True. (≈ 1 line)
    a = Bidirectional(LSTM(n_a, return_sequences=True))(X)

    # Step 2: Iterate for Ty steps
    for t in range(Ty):

        # Step 2.A: Perform one step of the attention mechanism to get back the context vector at step t (≈ 1 line)
        context = one_step_attention(a, s)

        # Step 2.B: Apply the post-attention LSTM cell to the "context" vector.
        # Don't forget to pass: initial_state = [hidden state, cell state] (≈ 1 line)
        s, _, c = post_activation_LSTM_cell(context, initial_state = [s, c])

        # Step 2.C: Apply Dense layer to the hidden state output of the post-attention LSTM (≈ 1 line)
        out = output_layer(s)

        # Step 2.D: Append "out" to the "outputs" list (≈ 1 line)
        outputs.append(out)

    # Step 3: Create model instance taking three inputs and returning the list of outputs. (≈ 1 line)
    model = Model(inputs=[X, s0, c0], output=outputs)

    ### END CODE HERE ###

    return model
3. Compile
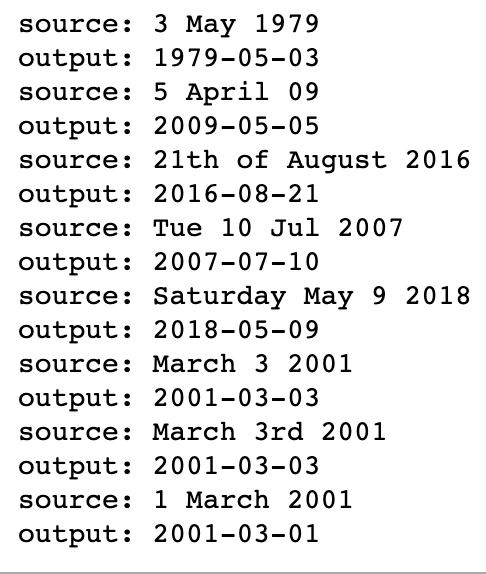
opt = Adam(lr=0.005, beta_1=0.9, beta_2=0.999, decay = 0.01)
model.compile(loss='categorical_crossentropy', optimizer=opt, metrics=['accuracy'])
EXAMPLES = ['3 May 1979', '5 April 09', '21th of August 2016', 'Tue 10 Jul 2007', 'Saturday May 9 2018', 'March 3 2001', 'March 3rd 2001', '1 March 2001'] for example in EXAMPLES: source = string_to_int(example, Tx, human_vocab) source = np.array(list(map(lambda x: to_categorical(x, num_classes=len(human_vocab)), source))).swapaxes(0,1) prediction = model.predict([source, s0, c0]) prediction = np.argmax(prediction, axis = -1) output = [inv_machine_vocab[int(i)] for i in prediction] print("source:", example) print("output:", ''.join(output))- 결과:
-
'연구실' 카테고리의 다른 글
#26. "Deep Learning Cookbook" - 9. 이미 훈련된 이미지 인식 신경망 재사용하기 (0) 2019.11.08 #25. YOLO v3 with PyTorch (0) 2019.11.07 #23. Emojify (0) 2019.10.28 #22. Operations on word vectors (0) 2019.10.26 #21. Improvise a Jazz Solo with an LSTM Network (0) 2019.10.24